I bought a few 1893 U-Fixem's a while back. One had a bent barrel, so I
decided to put a new barrel on it. I got two of the Swedish Mauser barrels from
Samco as these seem to be the same profile as the Turkish barrels. This turned
out to be true. This project has been going on for more months than I care to
admit. I work in spurts and it has taken me quite a long time. Part of the reason
for the delay is
the cost. I've found that if I spend $50 or so at a time spread out over a year
or so, I won't notice the real costs of the project. I made a list of all the
tools that I've acquired for this project at the bottom of the page.
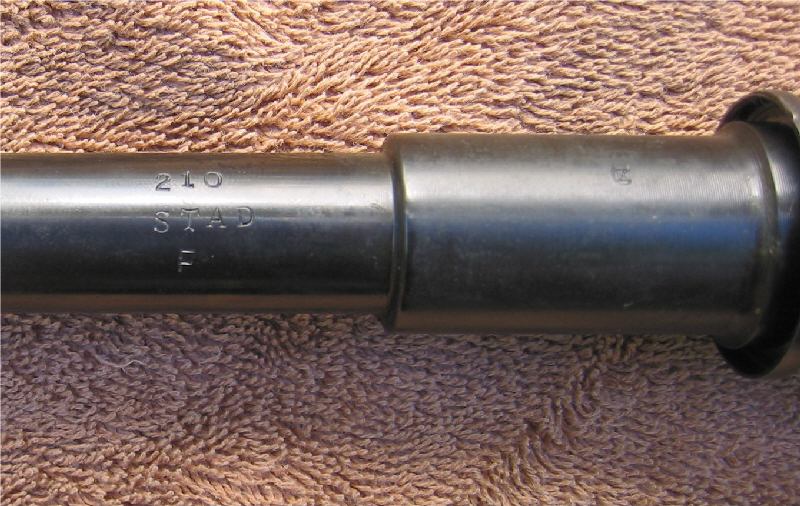
The Swedish Mauser Barrel
I bought the 29 inch ones from Samco for $70. These are nicely blued, with a
small amount of grease in the bore. The only markings on my barrels where
"210 STAD F" and a C/K thing.. They look to be worth the price. One of the employees at
Samco said they had lots of them. I put a Remington made Swedish Mauser case into the
chamber and it swallows the case as much as you would want. These aren't short
chambered barrels.
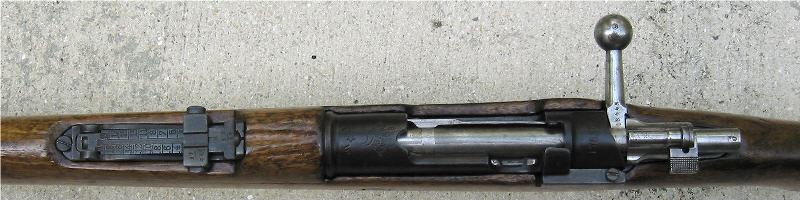
Preparing the receiver
I took the old bent barrel off using the Wheeler Engineering barrel vise and
receiver wrench. This was pretty simple. I removed the sights by heating them
with a torch and applying a little force. I sprayed down the stripped receiver
with carb cleaner and then cold blued it with BWC PermaBlue. This didn't give a
great finish, but certainly a lot better than the old finish. I probably should
have polished the receiver before blueing it, but I just didn't do it. I did
polish the bolt and it looks a lot better.
I decided to lap the lugs if they needed it, and they certainly did need it.
I lightly blued the two lugs on the bolt and worked them in the action. Neither one
of them showed any significant lug engagement, like 10% at best. I picked up the
Brownell lug lapping tool and some carbide grit. I followed the directions and
eventually I was able to get complete engagement on one lug and most of the
other lug to engage. The receiver did show some lug setback. This is only
visible when the barrel is removed.
The bolt face was in very good shape and I didn't have to do anything to
remove the effects of corrosion. I decided not to worry about squaring the face.
I didn't feel like buying anymore tools at this point.
My neighbor has a lathe and was willing to true the receiver face. I picked
up a receiver mandrel somewhere and my neighbor did the rest. This receiver has
the hand guard extension added to it, so it isn't real easy to get to the face,
but my neighbor had a cutter that reached around it. The face was very true
already and I only removed a few thousandths.
Screwing in the barrel
This was the easy part. I had a pair of 6.5x55 Go and NoGo headspace gauges
and I was hoping I could just screw in the barrel and it would headspace. You
can't imagine how happy I was when I closed the bolt on the Go gauge and
couldn't close on the NoGo gauge. It was a perfect fit!

The Stock
I used a standard Turkish pistol grip stock on this rifle. Since this
receiver had the cut-off removed, it has the newer style pistol grip stock first
seen on the 1903 model. I did some sanding, but not much. The stock isn't
great looking, but it's a big stock and seems to be very solid. If it doesn't
shoot well, then I'll bed it to the receiver, or at least bed the recoil lug.
Replacing the Rear Sight
It's really easy to align the rear sight base to the barrel. Simply set the
barreled action in the stock and put on the hand guard. There isn't much choice
in location of the rear sight base. I marked the barrel with a punch through the
set screw hole. My neighbor was nice enough to use his mill to make a 40 thousandths
deep hole at my punch mark.
My neighbor then volunteered to help me with the soldering as I have no
soldering experience. First we tinned the barrel, since the sight base was
already tinned. To tin the barrel, we sanded down to the bare metal on the
barrel where the solder would go. This is supposed to help the solder stick.
Next we applied solder paste to help the solder flow and then heated the barrel
with a torch until we could apply solder to the barrel and cover the sanded area
with solder. As I learned the hard way, clean the grease out of the barrel
before you heat it up. It's a lot easier to do before you apply heat than
afterwards.
At this point, just slip on the sight base, screw in the set screw and heat
up the bottom of the sight base. You don't have to apply much heat to the base
to get it hot. I found that the set screw had come loose when I turned over the
barrel. I lined up the base and screwed in the set screw again while still hot
and the solder had not yet set. I guess the base had expanded when heated and
the screw drew up out of the hole. I didn't have a very deep hole. Now I know
why they make them so deep.
Replacing the Front Sight
There are all kinds of methods for lining up the front sight. I pretty much
cheated. I first lined it up by eye. I then used the set screw to hold it in
place and went and fired a few rounds to verify the location. The eyeballing
method was pretty good. I went back and had my neighbor use the mill to make the
set screw hole. I wanted to try some "Instant Solder" and it seemed to
work very well. It was a little messy, but I didn't have to heat the barrel much
to get it flowing. The sight base really looks bad against the perfect bluing of
the Swede barrel, but that is the way it goes.
Finished!
Barrel Break In
I first fired 12 rounds to see if the sights were aligned, and that also let
me know that the barrel is very rough as those 12 rounds put a lot of visible
copper in the barrel. Just shining a light down the bore from the muzzle
revealed lots of reddish copper. It cleaned up easily, but it may take a long
time to break in the barrel and smooth down the machining marks to get it to the
point where it generates very little copper fouling. I fired 12 more rounds once
I had soldered the front sight in place. Again, a fair amount of copper for 12
rounds, but it cleaned up easily.
After firing 80 rounds the accuracy suddenly improved and fouling has
decreased a bit. I was able to fire a 1.350" 5 shot group at 100 yards
using 140 grain Sierra BTHP bullets. I have a few match rifles
with very fine match barrels and they hardly foul at all. I don't expect this
Swede barrel to compare to a match barrel, but I can always hope.
I cleaned out the barrel with my
Foul Out kit after 90 rounds and there was a good deal of copper fouling in the
last 12 inches of the bore. I cleaned normally after 145 rounds and fouling was negligible.
I guess that this is now broken in and I should expect to see my best groups
soon.
Here are the tools that I bought. As you can imagine, it would be far cheaper
to have paid someone to do the work. I'll probably rebarrel a few more rifles to
make it more cost effective. It was certainly a good learning experience and I
had lots of fun doing it.
- Wheeler Engineering Barrel Vise
- Wheeler Engineering Mauser Action Wrench
- Wheeler Engineering SRM (Small Ring Mauser) Receiver Mandrel
- Forster 6.5 Swede Go, NoGo gauges
- Brownell SRM Bolt Lug Lapping tool (and some carbide grit)